1. generate your key pairs http://troubleshoo.blogspot.com/2015/12/windowshow-to-create-public-private-key.html
2. Append your public key to the server's authorized_keys http://troubleshoo.blogspot.com/2015/12/puttyhow-to-append-your-public-keys-to.html
3. Log onto the server using PUTTY with keys http://troubleshoo.blogspot.com/2015/12/putty-how-to-log-on-to-server-with.html
Thursday, December 31, 2015
[PUTTY] how to log on to the server with public key/private key
ref: https://www.digitalocean.com/community/tutorials/how-to-use-ssh-keys-with-putty-on-digitalocean-droplets-windows-users
Setting Up an SSH Session with SSH Keys in PuTTY
Now that we have a droplet with our public key inside, we can use PuTTY to connect to it. We will do this by setting up and saving a session. This way we will be able to quickly reconnect at a later time with all of our settings saved.
Start by opening up the main PuTTY program. You can do this by double clicking on the PuTTY program, or by tapping the Windows key and typing "PuTTY".
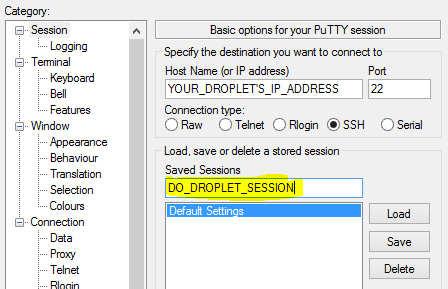
Inside, you'll be taken to the main session screen. The first step is to enter the IP address of your droplet into the session page. You can get this address from your DigitalOcean control panel:
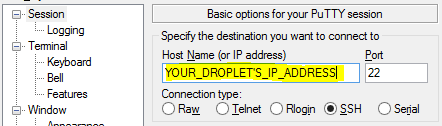
By default, SSH happens on port 22, and the "SSH" connection type should be selected. These are the values we want.
Next, we'll need to select the "Data" configuration inside the "Connection" heading in the left-hand navigation menu:
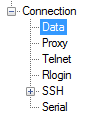
Here, we will enter our server's username. For the initial setup, this should be the "root" user, which is the administrative user of your server. This is the account that has been configured with your SSH public key. Enter "root" into the "Auto-login username" prompt:

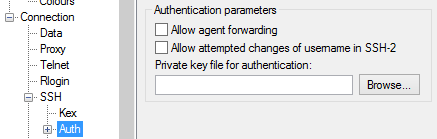
Next, we'll need to click on the "SSH" category in the navigation menu:

Within this category, click on the "Auth" sub-category.
There is a field on this screen asking for the "Private key file for authentication". Click on the "Browse" button:
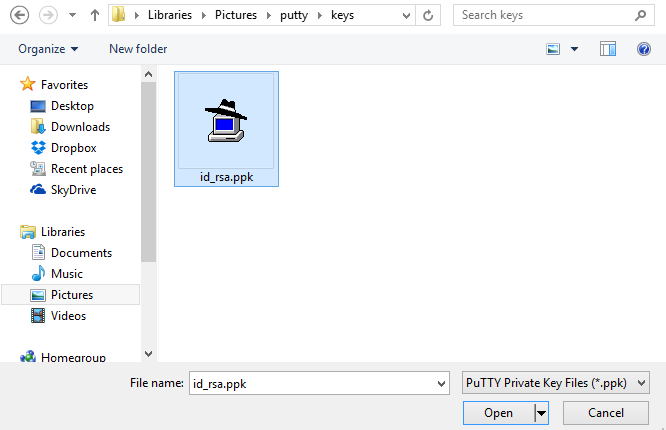
Search for the private key file that you saved. This is the key that ends in ".ppk". Find it and select "Open" in the file window:
Now, in the navigation menu, we need to return to the "Session" screen that we started at.
This time, we need to create a name for the session that we will be saving. This can be anything, so select something that will help you remember what this is for. When you are finished, click on the "Save" button.
You now have saved all of the configuration data needed to connect to your new server.
Connect to Your Server Using the Saved PuTTY Session
Now that you have your session saved, you can recall these values at any time by returning to the "Session" screen, selecting the session you would like to use in the "Saved Sessions" section, and click "Load" to recall the settings.
This will auto-fill all of the fields with the values you initially selected.
When you are ready to actually connect to your server, on the "Sessions" screen, click the button at the bottom that says "Open" after you have loaded your session:

The first time that you connect with the remote host, you will be asked to verify the identity of the remote server. This is expected the first time you connect to a new server, so you can select "Yes" to continue.

Afterwards, you should immediately be logged into your new server without ever having to type in a password:
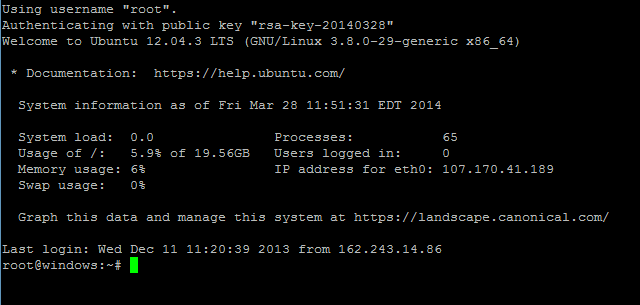
If you've gotten this far, you've successfully configured SSH keys with DigitalOcean!
Conclusion
You should now be able to easily deploy new DigitalOcean VPS instances with your SSH public key. You can use the SSH keys you created on as many servers as you would like. They are not one-time use configurations.
To learn about how to embed your PuTTY SSH keys into server instances that you already have up and running, follow this guide.
[PUTTY]How to append your public keys to the authorized_keys on the server
after you generate your keys using PUTTYGEN (http://troubleshoo.blogspot.com/2015/12/windowshow-to-create-public-private-key.html)
1. you should use the computer that is already able to connect to the server to download your authorized_keys file from the server.
Mine is stored at ~/.ssh/authorized_keys
2. Use a text editor to open the authorized_keys
You should see all the keys stored there. The format is like this:
you should see something like this:
---- BEGIN SSH2 PUBLIC KEY-----
*************************
********************
*********************
___ END SSH2 PUBLIC KEY ---------
4. copy the text/key that I labeled using *****, and paste onto a new line of the authorized_keys file
5. update the file on the server.
Now your public key is added to the server
Read more for the public key format: https://wiki.mcs.anl.gov/IT/index.php/SSH_Keys:authorized_keys
1. you should use the computer that is already able to connect to the server to download your authorized_keys file from the server.
Mine is stored at ~/.ssh/authorized_keys
2. Use a text editor to open the authorized_keys
You should see all the keys stored there. The format is like this:
ssh-dss AAAAB3NzaC1kc3MAAACBAN+NX/rmUkRW7Xn7faglC/pxqbVIohbcVOt41VThMYORtMQr
QSqMZugxew2s9iX4qRowHWLBRci6404nSydLiDe1q6/NmpK+oQ8zD1yXekl+fruBAYeno7f6dM7c
2swwwXY6knp4umXkLItxIUki6SXM0WfabJ8BwuNDyA8IrbFAAAAFQCynEN3MYXbs4AA7E/1I03jb
B1rewAAAIAztzZUygrUI8XX6eE4zEHdTbv89AHYsAsf7fSAWnPxWc63dV0P5lCPNk58nze6+N+MD
X7ZQADT6710fvbOmEFLciTwBGHHLxIV+1iTApJSsQp9T+pdkbFzBZ+mqQamZpSN1hC8fXe/Uty0D
SbhnQ1qanwrOdKP1JV7DUgzehSfAAAAIEAwAyNYxUsGil46gZQea6sfhUnrBwyM6JnEbA6ogfGdS
T2TDn1U5rfTV9UuNHzfoZ4CplVHclXyUPPhbKqcedpuRPJhHN/lp5MH7Q2tI/UxHvmePNHrXKk86
XYt7RzKHjWbHRxf84GIyTlKa8yfNfFlf9oNXdtBXcsJjHIvNsBk= ThisIsACommentyou should see something like this:
---- BEGIN SSH2 PUBLIC KEY-----
*************************
********************
*********************
___ END SSH2 PUBLIC KEY ---------
4. copy the text/key that I labeled using *****, and paste onto a new line of the authorized_keys file
5. update the file on the server.
Now your public key is added to the server
Read more for the public key format: https://wiki.mcs.anl.gov/IT/index.php/SSH_Keys:authorized_keys
[Windows]How to create public / private key pair
Use PUTTYGEN
http://www.chiark.greenend.org.uk/~sgtatham/putty/download.html
It's quite intuitive to use. The only step you may misunderstand is : They ask you to move your mouse cursor in the blank area so that the randomness can be used to create the keys. The progress bar won't move unless you move your mouse there.
Make sure you save your public key and private key
How to log on server using PUTTY without typing username everytime
ref: https://www.howtoforge.com/ssh_key_based_logins_putty
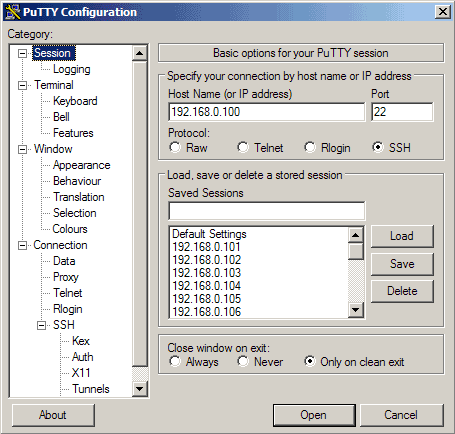
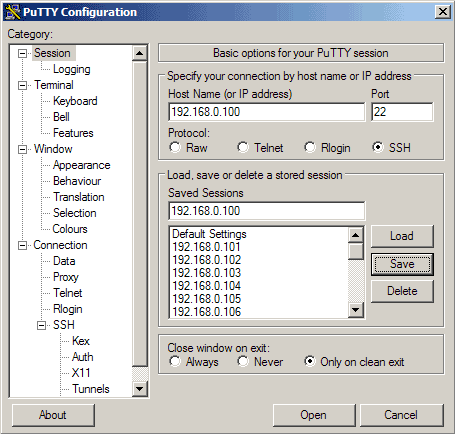
In PuTTY, you can create profiles for connections to your various SSH servers, so you don't have to type in the settings again when you want to connect to a certain server again.
Let's create a profile for our 192.168.0.100 server. Start PuTTY by double-clicking its executable file. You are now in the category Session (see the tree on the left side of the screenshot). Enter 192.168.0.100 under Host Name (or IP address), enter 22 under Port and select SSH under Protocol:
Then go to Connection -> Data and specify the username with that you want to log in to your SSH server under Auto-login username. In this article I use root:
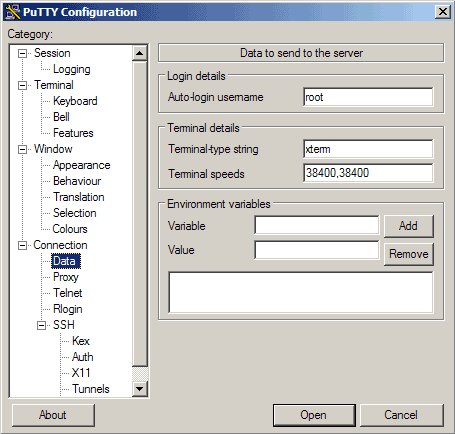
Then go to Session again. Under Saved Sessions enter a name for the profile, e.g. 192.168.0.100 or any other string that lets you remember for which server the profile is. Then click on Save:
The next time you use PuTTY, you can simply select the appropriate profile from the Saved Sessions textarea, click on Load and then Open.
Sunday, December 27, 2015
PCR bias
Abstract
Despite the ever-increasing output of Illumina sequencing data, loci with extreme base compositions are often under-represented or absent. To evaluate sources of base-composition bias, we traced genomic sequences ranging from 6% to 90% GC through the process by quantitative PCR. We identified PCR during library preparation as a principal source of bias and optimized the conditions. Our improved protocol significantly reduces amplification bias and minimizes the previously severe effects of PCR instrument and temperature ramp rate.
Background
The Illumina sequencing platform [1], like other massively parallel sequencing platforms [2,3], continues to produce ever-increasing amounts of data, yet suffers from under-representation and reduced quality at loci with extreme base compositions that are recalcitrant to the technology[1,4-6]. Uneven coverage due to base composition necessitates sequencing to excessively high mean coverage for de novo genome assembly [7] and for sensitive polymorphism discovery [8,9]. Although loci with extreme base composition constitute only a small fraction of the human genome, they include biologically and medically relevant re-sequencing targets. For example, 104 of the first 136 coding bases of the retinoblastoma tumor suppressor gene RB1 are G or C.
Traditional Sanger sequencing has long been known to suffer from problems related to the base composition of sequencing templates. GC-rich stretches led to compression artifacts. Polymerase slippage in poly(A) runs and AT dinucleotide repeats caused mixed sequencing ladders and poor read quality. Processes upstream of the actual sequencing, such as cloning, introduced bias against inverted repeats, extreme base-compositions or genes not tolerated by the bacterial cloning host. Gaps due to unclonable sequences had to be recovered and finished by PCR [10], or, in some cases, by resorting to alternative hosts [11]. Cloning bias hindered efforts to sequence the AT-rich genomes of Dictyostelium [12] and Plasmodium [13] and excluded the GC-rich first exons of about 10% of protein-coding genes in the dog (K Lindblad-Toh, personal communication) from an otherwise high-quality reference genome assembly [14].
New genome sequencing technologies [1-3,15-17] no longer rely on cloning in a microbial host. Instead of ligating DNA fragments to cloning vectors, the three major platforms currently on the market (454, Illumina and SOLiD) involve ligation of DNA fragments to special adapters for clonal amplification in vitro rather than in vivo. Due to the massively parallel nature of the process, standardized reaction conditions must be applied to amplify and sequence complex libraries of fragments that comprise a wide spectrum of sequence compositions. All three platforms display systematic biases and unevenness as the observed coverage distributions are significantly wider than the Poisson distribution expected from unbiased, random sampling [18].
The Illumina sequencing process consists of i) library preparation on the lab bench, ii) cluster amplification, sequencing-by-synthesis and image analysis on proprietary instruments, followed by iii) post-sequencing data processing. Bias can be introduced at all three stages. For example, high cluster densities on the Illumina flowcell suppress GC-rich reads. Changes to sequencing kits, protocols and instrument firmware can affect the base composition of sequencing data. Moreover, bias is known to vary between laboratories, from run to run or even from lane to lane on the same flowcell. Such variability and instability in the system confound comparative studies [19,20] and render systematic bias investigations difficult.
http://genomebiology.com/2011/12/2/R18
Selenocysteine and selenoprotein
http://en.wikipedia.org/wiki/Selenocysteine
http://www.ncbi.nlm.nih.gov/pubmed/12730456
http://www.ncbi.nlm.nih.gov/pubmed/12730456
Streaming media
From Wikipedia, the free encyclopedia

Streaming media is multimedia that is constantly received by and presented to an end-user while being delivered by a provider. Its verb form, "to stream", refers to the process of delivering media in this manner; the term refers to the delivery method of the medium rather than the medium itself.
A client media player can begin playing the data (such as a movie) before the entire file has been transmitted. Distinguishing delivery method from the media distributed applies specifically to telecommunications networks, as most other delivery systems are either inherently streaming (e.g., radio, television) or inherently nonstreaming (e.g., books, video cassettes, audio CDs).
Surrogacy -- gestational or traditional
In gestational surrogacy, the pregnancy results from the transfer of an embryo created by IVF, in a manner so the resulting child is genetically unrelated to the surrogate. Gestational surrogates are also referred to as gestational carriers.
In traditional surrogacy, the surrogate is impregnated naturally or artificially, but the resulting child is genetically related to the surrogate. In the U.S, gestational surrogacy is more common than traditional surrogacy and is considered less legally complex.[1]
Intended parents may seek a surrogacy arrangement when medical issues make pregnancy not possible or make carrying a pregnancy risky or otherwise undesirable, or because the intended parent or parents are male. Monetary compensation may or may not be involved in surrogacy arrangements. If the surrogate receives compensation beyond the reimbursement of medical and other reasonable expenses, the arrangement is called commercial surrogacy; otherwise, it is referred to as altruistic surrogacy.[2] The legality and costs of surrogacy vary widely between jurisdictions, sometimes resulting in interstate or international surrogacy arrangements.
The History of Cloning
ref:http://learn.genetics.utah.edu/content/cloning/clonezone/
Lost in the midst of all the buzz about cloning is the fact that cloning is nothing new: its rich scientific history spans more than 100 years. The landmark examples below will take you on a journey through time, where you can learn more about the history of cloning.
Lost in the midst of all the buzz about cloning is the fact that cloning is nothing new: its rich scientific history spans more than 100 years. The landmark examples below will take you on a journey through time, where you can learn more about the history of cloning.
1885 - First-ever demonstration of artificial embryo twinning
Sea urchin
Hans Adolf Edward Dreisch
Hans Adolf Edward Dreisch
The sea urchin is a relatively simple organism that is useful for studying development. Dreisch showed that by merely shaking two-celled sea urchin embryos, it was possible to separate the cells. Once separated, each cell grew into a complete sea urchin.
This experiment showed that each cell in the early embryo has its own complete set of genetic instructions and can grow into a full organism.

1902 - Artificial embryo twinning in a vertebrate
Salamander
Hans Spemann
Hans Spemann
Spemann’s first challenge was to figure out how to split the two cells of an embryo much stickier than sea urchin cells. Spemann fashioned a tiny noose from a strand of baby hair and tightened it between two cells of a salamander embryo until they separated. Each cell grew into an adult salamander. Spemann also tried to divide more advanced salamander embryos using this method, but he found that cells from these embryos weren’t as successful at developing into adult salamanders.
This experiment showed that embryos from a more-complex animal can also be “twinned” to form multiple identical organisms—but only up to a certain stage in development.

1928 - The cell nucleus controls embryonic development
Salamander
Hans Spemann
Hans Spemann
Again using a strand of baby hair tied into a noose, Spemann temporarily squeezed a fertilized salamander egg to push the nucleus to one side of the cytoplasm. The egg divided into cells—but only on the side with the nucleus. After four cell divisions, which made 16 cells, Spemann loosened the noose, letting the nucleus from one of the cells slide back into the non-dividing side of the egg. He used the noose to separate this “new” cell from the rest of the embryo. The single cell grew into a new salamander embryo, as did the remaining cells that were separated.
Essentially the first instance of nuclear transfer, this experiment showed that the nucleus from an early embryonic cell directs the complete growth of a salamander, effectively substituting for the nucleus in a fertilized egg.

1952 - First successful nuclear transfer
Frog
Robert Briggs and Thomas King
Robert Briggs and Thomas King
Briggs and King transferred the nucleus from an early tadpole embryo into an enucleated frog egg (a frog egg from which the nucleus had been removed). The resulting cell developed into a tadpole.
The scientists created many normal tadpole clones using nuclei from early embryos. But just like Spemann’s salamander experiments, cloning was less successful with donor nuclei from more advanced embryos: the few tadpole clones that did survive grew abnormally.
Most importantly, this experiment showed that nuclear transfer was a viable cloning technique. It also reinforced two earlier observations. First, the nucleus directs cell growth and, ultimately, an organism’s development. Second, embryonic cells early in development are better for cloning than cells at later stages.

1958 - Nuclear transfer from a differentiated cell
Frog
John Gurdon
John Gurdon
Gurdon transplanted the nucleus of a tadpole intestinal cell into an enucleated frog egg. In this way, he created tadpoles that were genetically identical to the one from which the intestinal cell was taken.
This experiment showed that, despite previous failures, nuclei from somatic cells in a fully developed animal could be used for cloning. Importantly, it suggested that cells retain all of their genetic material even as they divide and differentiate (although some wondered if the donor DNA came from a stem cell, which can differentiate into multiple types of cells).

1975 - First mammalian embryo created by nuclear transfer
Rabbit
J. Derek Bromhall
J. Derek Bromhall
Mammalian egg cells are much smaller than those of frogs or salamanders, so they are harder to manipulate. Using a glass pipette as a tiny straw, Bromhall transferred the nucleus from a rabbit embryo cell into an enucleated rabbit egg cell. He considered the procedure a success when a morula, or advanced embryo, developed after a couple of days.
This experiment showed that mammalian embryos could be created by nuclear transfer. To show that the embryos could continue developing, Bromhall would have had to place them into a mother rabbit's womb. He never did this experiment.

1984 - First mammal created by nuclear transfer
Sheep
Steen Willadsen
Steen Willadsen
Willadsen used a chemical process to separated one cell from an 8-cell lamb embryo. The he used a small electrical shock to fuse it to an enucleated egg cell. As luck would have it, the new cell started dividing.
By this time, in vitro fertilization techniques had been developed, and they had been used successfully to help couples have babies. So after a few days, Willadsen placed the lamb embryos into the womb of surrogate mother sheep. The result was the birth of three live lambs.
This experiment showed that it was possible to clone a mammal by nuclear transfer—and that the clone could fully develop. Even though the donor nuclei came from early embryonic cells, the experiment was considered a great success.

1987 - Nuclear transfer from embryonic cell
Cow
Neal First, Randal Prather, and Willard Eyestone
Neal First, Randal Prather, and Willard Eyestone
Using methods very similar to those used by Willadsen on sheep, First, Prather, and Eyestone produced two cloned calves. Their names were Fusion and Copy.
This experiment added cows to the list of mammals that could be cloned by nuclear transfer. Still, mammalian cloning was limited to using embryonic cells as nuclear donors. Cloning using nuclei from differentiated adult somatic cells still wasn’t thought possible.

1996 - Nuclear transfer from laboratory cells
Sheep
Ian Wilmut and Keith Campbell
Ian Wilmut and Keith Campbell
All previous cloning experiments used donor nuclei from cells in early embryos. In this experiment, the donor nuclei came from a slightly different source: cultured sheep cells, which were kept alive in the laboratory.
Wilmut and Campbell transferred the nuclei from cultured cells into enucleated sheep egg cells. The lambs born from this procedure were named Megan and Morag.
This experiment showed that cultured cells can supply donor nuclei for cloning by nuclear transfer. Because scientists had already learned how to transfer genes into cultured cells, this experiment showed that it might be possible to use such modified cells to create transgenic animals—such as cows that could make insulin for diabetics in their milk.

1996 - Dolly: First mammal created by somatic cell nuclear transfer
Sheep
Ian Wilmut and Keith Campbell
Ian Wilmut and Keith Campbell
In this landmark experiment, Wilmut and Campbell created a lamb by transferring the nucleus from an adult sheep's udder cell into an enucleated egg. Never before had a mammal been cloned from an adult somatic cell. What was the big deal?
Every cell’s nucleus contains a complete set of genetic information. However, while embryonic cells are ready to activate any gene, differentiated adult cells have shut down the genes that they don't need for their specific functions. When an adult cell nucleus is used as a donor, its genetic information must be reset to an embryonic state. Often the resetting process is incomplete, and the embryos fail to develop.
Of 277 attempts, only one produced an embryo that was carried to term in a surrogate mother. This famous lamb, named Dolly, brought cloning into the limelight. Her arrival started conversations about the implications of cloning, bringing controversies over human cloning and stem cell research into the public eye.

1997 - First primate created by embryonic cell nuclear transfer
Rhesus monkey
Li Meng, John Ely, Richard Stouffer, and Don Wolf
Li Meng, John Ely, Richard Stouffer, and Don Wolf
Primates are good models for studying human disorders. Cloning identical primates would decrease the genetic variation of research animals, and therefore the number of animals need in research studies.
Similar to previous cloning experiments, Wolf’s team of scientists fused early-stage embryonic cells with enucleated monkey egg cells using a small electrical shock. The resulting embryos were then implanted into surrogate mothers. Out of 29 cloned embryos, two monkeys were born. One was a female named Neti, and the other was a male named Ditto.
This experiment showed that primates, humans’ closest relatives, can be cloned.

1997 - Nuclear transfer from genetically engineered laboratory cells
Sheep
Angelika Schnieke, Keith Campbell, Ian Wilmut
Angelika Schnieke, Keith Campbell, Ian Wilmut
This experiment was an exciting combination of findings from earlier work. Campbell and Wilmut had already created a clone using the nucleus of a cultured cell. This time, the researchers introduced the human Factor IX (“factor nine”) gene into the genome of sheep skin cells grown in a laboratory dish. Factor IX codes for a protein that helps blood clot, and it's used to treat hemophilia, a genetic disorder where blood doesn't form proper clots.
To create the transgenic sheep, the scientists performed nuclear transfer using donor DNA from the cultured transgenic cells. The result was Polly, a sheep that produced Factor IX protein in her milk.
This experiment showed that sheep could be engineered to make therapeutic and other useful proteins in their milk, highlighting the potential medical and commercial uses for cloning.

1998-1999 - More mammals cloned by somatic cell nuclear transfer
Mice, cows, and goats
Multiple groups
Multiple groups
After the successes leading up to Dolly and Polly, other scientists wanted to see if similar techniques could be used to clone other mammalian species. Before long, several more animals had been successfully cloned. Among them were transgenic animals, clones made from fetal and adult cells, and a male mouse; all previous clones had been female.

2001 - Endangered animals cloned by somatic cell nuclear transfer
Gaur and Mouflon
Multiple groups
Multiple groups
As the list of successfully cloned animals grew, scientists began to explore cloning as a way to create animals belonging to endangered or extinct species. A challenge to cloning endangered and extinct species is finding closely related animals to serve as egg donors and surrogates. The gaur and mouflon were chosen in part because they are close relatives of domestic cattle and sheep, respectively.
In 2009, using goast as egg donors and surrogates, another group of researchers cloned the first extinct animal, a Spanish mountain goat called the bucardo. Sadly, the one kid that survived gestation died soon after birth due to a lung defect.

2007 - Primate embryonic stem cells created by somatic cell nuclear transfer
Rhesus monkey
Shoukhrat Mitalipov and colleagues
Shoukhrat Mitalipov and colleagues
Researchers took a cell from an adult monkey and fused it with an enucleated egg cell. The embryo was allowed to develop for a time, then its cells were grown in a culture dish. These cells, because they can differentiate to form any cell type, are called embryonic stem cells.
This experiment showed that nuclear transfer in a primate, which researchers had tried for years without success, was possible. It opened the door to the possibility of human therapeutic cloning: creating individual-specific stem cells that could be used to treat or study diseases.

2013 - Human embryonic stem cells created by somatic cell nuclear transfer
Human
Shoukhrat Mitalipov and colleagues
Shoukhrat Mitalipov and colleagues
Overcoming decades of technical challenges, Mitalipov and colleagues were the first to use somatic cell nuclear transfer to create a human embryo that could be used as a source of embryonic stem cells. The resulting stem cell lines were specific to the patient they came from, a baby with a rare genetic disorder.
In this experiment, researchers took a skin cell from the patient and fused it with a donated egg cell. Key to the success of the experiment were modifications to the culture liquid in which the procedure was done and to the series of electrical pulses used to stimulate the egg to begin dividing.
Following the cloning controversy of 2004–2005, in which South Korean scientists falsely claimed to have used somatic cell nuclear transfer to create embryonic stem cell lines, the scientific community demanded much stronger evidence that the procedure had actually been successful.


Supported by a Science Education Partnership Award (SEPA) Grant No. R25RR016291 from the National Center for Research Resources, a component of the NIH. The contents provided here are solely the responsibility of the authors and do not necessarily represent the official views of NIH.
http://learn.genetics.utah.edu/content/cloning/clonezone/
latin square
an n × n array filled with n different symbols, each occurring exactly once in each row and exactly once in each column
Floxing
In genetics, floxing refers to the sandwiching of a DNA sequence (which is then said to be floxed) between two lox P sites. The terms are constructed upon the phrase "flanking/flanked by LoxP". Recombination between LoxP sites is catalysed by Cre recombinase. Floxing a gene allows it to be deleted (knocked out), translocated or inverted in a process called Cre-Lox recombination. [1]
http://en.wikipedia.org/wiki/Floxing
http://en.wikipedia.org/wiki/Floxing
Subscribe to:
Comments (Atom)